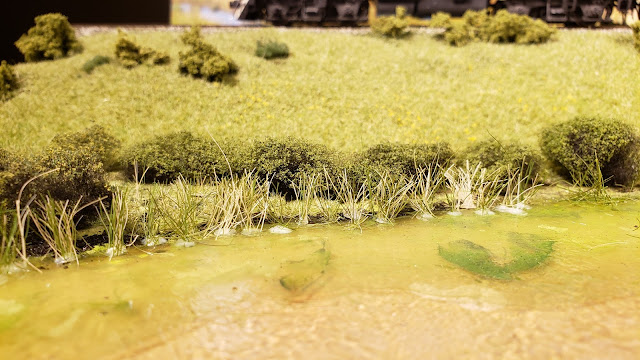
Modelling muskeg and swamp
Over the past several weeks I have been working on a small diorama to serve a couple of purposes: use it for model photography as well as to test some scenery ideas for use on my layout.
I used a piece of plexiglass that I had from an office renovation and used a 2x3 scrap for the roadbed. I carved up some foam insulation for the embankments and added a ditch as well. I coated this with foam coat. Once dry I used dollar store brown, green and black acrylics to paint the base.
My kids had some gaudy green paints that I tried out as pond scum. I thinned it with water and puddled it on the plexiglass to try and capture stagnant water with algae and other plant growth.
I used Microengineering code 70 weathered flextrack on cork roadbed. Before I ballasted I painted the ties randomly with various greys, browns and blacks to give some variation. I used Woodland Scenics fine grey ballast mixed with some very fine crushed ballast from an actual ballast pit from the line between Flin Flon and The Pas (thanks to my friend Tim)
Everything is glued down with diluted matte Modge Podge, and I'm liking the somewhat wet look I'm getting. If you have ever walked through muskeg and boggy ground you know that your feet will be very wet very quickly.
I put down ground cover, and followed up with static grass, trees and bushes. I finished the basic ground cover and bushes on the diorama and decided to put the various bits and pieces together to get a sense of how it will look.
I put a layer of 2mm light green grass on the diorama, trying to keep it on the slopes and above the break in the slope where it goes to the water. That will get different treatment. I like these initial results, I'll be adding some 4mm grass as well to get some areas with taller grass.
I picked up some Vallejo Weathering Effects Thick Black Mud (73.812) as it seems pretty close to the black muck you often see in swampy areas of the north. I used a skewer and a small artist trowel to apply the mud to the bottom of the ditch and at selected spots on the lakeshore. I like how it looks; now to get more overgrowth and such applied.
I progressed along with another layer of grass that I think adds sufficient depth to the slopes. I also sprinkled some yellow Woodland Scenics "pollen" to represent some flowers in a few areas as this is common.
I dug up some "Halloween Hay" that my wife found a few years ago. It is black spun polyester that works well for bushes. Some cheap hairspray and various ground foams gives a nice look without looking bulky.
Dark background with ripples.Light background with ripples.
I used Gloss Modge Podge on the top of the clear plexiglass to get a gentle ripple effect. I dabbed on a layer of the Modge Podge in generally the same way. In order to blend the dabs together using my airbrush to blow air over the Modge Podge. Thanks to Luke Towan for the idea. When the Modge Podge dried it had a nice subtle ripple effect.
Reeds in place, waiting for glue to dry.
I followed some of the ideas in Luke Towan's YouTube tutorial about using a piece of plywood with holes drilled in it to keep the fibers upright. I used 12mm static grass to represent reeds by putting dabs of glue on wax paper in each of the drilled holes (being careful to keep the glue off the sides) and putting a tuft in each opening. This allows the glue to dry while keeping the tufts upright. Once dry, the reeds were glued in place with Gloss Modge Podge along the edge of the water.
I finally got the poles, trees and other final items installed. I'm pretty satisfied with how this has turned out. Now to apply the lessons learned on the main layout.


Comments
Post a Comment