Etched end cages for slabside hoppers
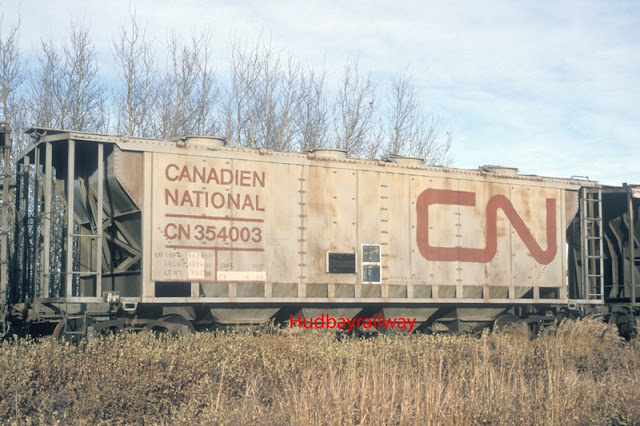
True Line Trains (purchased by Atlas Model Railroad Co. and re-released) came out with several variations of the Canadian "slabside hoppers" that were used from the 1950's through the 1990's in bulk commodity service. These cars were used by CN, CP, TH&B, PGE/BCR and CGLX. I recommend reading the "Smooth Canadian" article written by Ken Goslett in the August 1986 Railroad Model Craftsman magazine for the complete story on these cars.
In addition to TLT/Atlas, Funaro & Camerlengo and Sylvan Scale Models have made resin kits for various versions of these cars, some of which are only available in resin. However one of the difficulties with the resin kits are the end cages which are challenging to build properly. The TLT/Atlas car has fairly heavily cast end cages with oversized ladder rungs and an incorrect number of vertical posts on the A end of the car.

Fortunately Black Cat Decals (www.blackcatdecals.com) has released an etched metal kit to replace the end cages on all versions of these cars both kit and RTR. I helped with the development of the kit, mostly checking on fit and how close it was to the prototype cars. We're happy with how it turned out, and I thought I would show how I did my first car conversion.
I have a sizable fleet of slabside hoppers on my layout for bulk commodity service. I selected a TLT car that I had not weathered to test out the etchings. I clipped the ladder rungs and long grab irons from the verticals and sanded them smooth.
In the end I decided to remove all the vertical posts from the ends except for the inner posts on the sides. This was to give the etchings something to attach to as well as to give more resilience to the etched part for handling. I also notched the end roofwalk support to fit the etching behind. A sharp Xacto blade and careful notching will give a good fit for the etching.
The etchings were bent using my Mission Models Etchmate to get good sharp bends on the corners. I test fit the etchings on the ends and carefully trimmed them to fit. I sanded the areas on the car that would be under the etching so they were smooth, as well as to ensure the corners were at 90 degrees. Proceed with care and you will end up with a good surface to mount the etching on.


I also CA'ed a scale 2x2 styrene post in the corners to give some extra strength and to give more volume to the corner posts. After everything dried I airbrushed some TLT CN Grey #11 on the etching to match the paint on the CN slabside. In hindsight I should have attached the brake platform at this point along with the brake wheel housing but I ended up doing that after the end cage was installed.
I scraped the paint off the areas that will attach to the carbody and used thick CA to attach the etching. This was a bit finicky but in the end I got the etchings attached straight and true.
I attached the brake platform, brake housing and linkage from the RTR model on the B end. I used the original brake housing as a guide and made a styrene mount for it. I painted the back of the styrene before mounting the part to avoid stark white plastic showing through.


The etchings come with etched long grab irons but I elected to use phosphor bronze wire instead for the long end grabs. I used the supplied eye bolts to mount the wire. There are a few spare holes in the end verticals but they are not overly visible.
Comparing the new end cages to the RTR version you can see the much finer rungs and grab irons. This is a very nice improvement to the original cars, however it does take some time to do. I spent several hours total working on this car, however I expect this will get faster as I do additional cars. Now to get at the balance of the car fleet.


Nice improvement. Those bulky cast ladder rungs always bother me. Nice price too. How long did the work take?
ReplyDeleteHi Greg, I'd guess the entire project took about 5 hours, but a lot of that was figuring out how to proceed with the build.
ReplyDeleteIt will be faster as I do more of them down the road.
More nice work by you! Do you know if the etched metal ends fit the Funaro and Camerlengo models?
ReplyDeleteHi Fraser, we checked the various manufacturers and all were within fractions of a mm so these should also fit F&C. There might be some sanding and/or filling but they should work. Glad you are enjoying the blog.
ReplyDelete