Hudson Bay Mining and Smelting GE 70 Tonners
HBM&S operated a total of 9 units, #1 was purchased new while the balance were purchased used in the late 1960's and 1970's. The fleet lasted until the early 1990's basically intact with only #4 being scrapped early. The others were mixed and matched to keep a number of the units operational. #1 was rebuilt in the early 2000's with a Cat engine.
HBM&S #3 soldiered on until the late 1990's before being scrapped onsite along with the rest of the 70T fleet. The replacements for these units were former CP SW1200RS units which are still used today.
Kaslo Shops has a nicely done set of etchings for their 70T kit. They include door handles for the long hood. When you install them they really make the locomotive "pop".
The long hood was also modified to reflect the filter arrangement on #3. The original kit was a flat kit with separate sides, end and roof. I got a second kit and chopped the hood to get the correct arrangement. The new 70T kit is a one piece body which is an easier build but more challenging to modify.
One thing I have found is that the steps tend to come loose with handling, so I added 0.0125" wire pins to help secure them in place. I also added pins on the pilots as well to help keep them in place. I'll need to do some careful sanding to clean up the nubs of the wire.
The Kaslo kit was designed to fit on the Bachmann drive that has the motor in the center with two geared trucks. It might also fit the old drive with two motors but I don't have any of those. I may also investigate what can be done to quiet the drive down. Loksound has just announced a GE 70T sound file so I have that to replace the factory decoder in the model.
I moved forward on painting the locomotive using Vallejo Air paint and my airbrush. I am a fan of the Vallejo Air product line, it sprays very well and goes on nicely. Vallejo Air Dark Blue 71.266 looks pretty good to my eye, particularly since the blue on these locomotives changed over the years. I have a paint chip somewhere in my files that has about 4 shades of different blue paint from one HBM&S locomotive, so pretty much any blue is probably correct. Whatever the paint crew could find at the hardware store was likely used.
I masked the body with Tamiya tape along the bottom with regular painters tape over the rest of the body. Tamiya tape snuggles in nicely to the nooks and crannies and gives a nice sharp edge to the body. The walkway and underframe got a custom warm black that was a mix of 5 parts Vallejo Air black 71.057 and 1 part dark grey 71.308 with some Airbrush flow enhancer thrown in for good measure. I'm pleased with the results.
Since I switched to modelling #3 I had to replace the exhaust stack as well. I found a set of Custom Finishes extended EMD stacks (part S-247) in my stash that looked good and had the correct height and shape. #3 didn't have the stack extension in 1978 but had it by 1981, which is fortunate as I like the look of the taller stack A bit of steel, black and brown paint on the brass extension and we're good to go.
I painted the trucks and fuel tank with a warm black mix that was roughly the same as the walkway and pilots, but I tried to lighten it just a tad to reflect what was seen on the prototype. I added a bit of Games Effects 72.136 Dry Rust to the fuel tank and frame paint, as well as on the wheel surfaces. This is a nice gritty looking rust that works well for roller bearing wheel faces as well as surface rust on areas like springs and surfaces on trucks.
In the 1970's and early 1980's HBM&S painted the stepwells of their locomotives white, likely for visibility to the crews. On #3 the upper two stepwells were white. I handpainted these on the model, not being overly concerned with even colouring as the prototype paint looked pretty rough in the reference photos. The model will get fairly heavy weathering so this will add to the character of the locomotive. I touched up any errors with black paint.
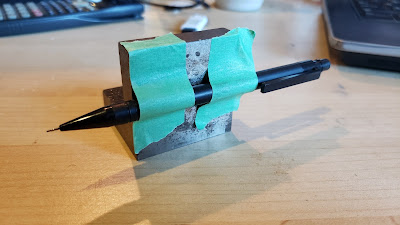
I airbrushed some Vallejo gloss varnish on the carbody and carefully applied the decals from PDC. I drew a light pencil line around the carbody using a "fancy" custom made device:
I aligned the pencil based on photos and carefully moved the engine shell and drew a line along the top of the stripe. This will be all but invisible when the decals are applied and sealed. The locomotive, desktop and device are all level so a good marker line is made this way. I trust this more than my eye to keep the striping on the same level.

I painted the etched handrails with Tamiya white primer while they were still on the fret and cut them out after the primer dried. I touched up any areas that were missed with white paint and glued the handrails in place after bending them to shape. The etchings are much finer than the Bachmann handrails and are more resilient to handling as well.
This locomotive doesn't have MU so I only added a pair of air hoses on either side of the coupler. One was for the brakes and the other was used to operate the air dump ore cars.


Comments
Post a Comment